

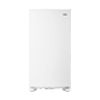
Winterizing a Refrigerator
How to Winterize Your Maytag Refrigerator
Storing your Maytag refrigerator in an unheated space or leaving home during winter? Proper winterization protects internal components from freezing, prevents odors and mildew, and ensures the appliance is ready for reliable use when you return. The guidance below explains how to prepare your refrigerator for long-term cold-weather storage.
Why Winterizing Matters
Cold temperatures can affect performance and parts. Winterizing reduces these risks by ensuring the interior is clean and dry, water is fully drained, and the unit is protected from freezing conditions.
Key benefits include:
- Preventing damage from freezing: Draining water from dispensers and ice makers helps avoid cracked tubing, valves, and reservoirs.
- Reducing Odor: Leaving food residues encourages mold and unpleasant smells. Always defrost, clean, and dry the interior thoroughly. Remove and wash bins, shelves, and gaskets to eliminate trapped moisture.
Refrigerator without an Ice maker or Water Dispenser
- Remove all food and beverages
- Turn all controls to the "OFF" position
- Thoroughly wipe down the entire inside of the refrigerator and freezer sections. This includes all bins, drawers, shelves, and walls.
- We recommend using warm, soapy water and a soft cloth.
- Completely dry all surfaces
- Unplug the Refrigerator
- Leave doors open to help with air circulation.
Refrigerator with an Ice maker or Water Dispenser
- Turn off the water supply to the refrigerator
- Remove and discard the Water Filter (on some models)
- Using a large pitcher or container, engage the water dispenser for several minutes to purge the water line.
- Remove and discard all the ice from the ice bin. Keep the ice maker turned on for 24 hours. This allows enough time for the ice maker to complete any harvest cycles and use up any remaining water that might be in the water line. You might hear a buzzing sound during this time.
- Disconnect the water supply line connected to the back of the refrigerator.
- TIP: Have a bucket or container ready, as some remaining water might continue to drain from the water line.
- Remove all food and beverages.
- Thoroughly wipe down the entire inside of the refrigerator and freezer sections, including all bins, drawers, shelves, and walls.
- We recommend using warm, soapy water and a soft cloth.
- Completely dry all surfaces
- Remove any remaining ice cubes from the ice bucket, and turn the ice maker to the "OFF" position.
- Unplug the Refrigerator
- Leave doors open to help with air circulation.
NOTE: Refer to the Owner's Manual for specific Installation Instructions for your Refrigerator
If you would like to download or view product literature for your appliance, please visit our Manuals and Literature page.
