

WPS Connection for Maytag Washer and Dryer
How to Connect Maytag Washer and Dryer via the WPS Method
Provisioning your appliance with WPS
In the event you are unable to provision a Maytag Smart Front Load Washer or Dryer via the App or Scan to Connect method, you also have the option to use the WPS approach.
NOTE: The ability to use WPS (aka Wireless Protected Setup) is limited to routers that support the WPS standard. The following method will work on approximately 85% of consumer routers.
Models Supported
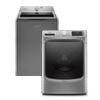
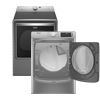
These instructions apply to Maytag models: MHW8630* MED8630H* & MGD8630H*
Control Panel aka Human-Machine Interface (HMI)
In the lower, middle of the control panel is the WiFi Connect button. Centered directly above the WiFi Connect button is a white LED that indicates your connection status. Please refer to the red dots in the following illustration.

The LED above the WiFi Connect button has four possible states. They are Off, Slow Flash, Fast Flash and On solid. When the LED is off, the appliance is not connected to WiFi. Similarly, when the LED is on solid, it indicates your appliance is connected to your router / home network and WiFi is available.
WPS Mode
WPS is a wireless network security standard that tries to make connections between a router and wireless devices faster and easier. Pressing and holding the WiFi Connect button for 3 seconds will put the appliance in WPS mode. You can verify that WPS is active by observing the LED located and centered above the button labeled WiFi Connect. When in WPS mode, the LED will rapidly flash at a rate of 2-3 flashes per second and you will see a 2:00 minute countdown timer on the display.
Using WPS to provision the appliance
WPS Requirements:
- A home wireless router capable of WiFi Protected Setup (WPS).
- A home wireless router capable of WPA-2 security (not WEP).
- The router should be on, within range and have a live Internet connection.
Ensure the Smart Appliance and Wireless Router are properly installed and powered on; an Internet connection is required.
NOTE: Only one Smart Appliance can be linked at a time. Repeat steps for each smart appliance.
IMPORTANT: Complete the next 2 steps within 2 minutes!
- On the wireless router, locate and press the WPS (WiFi Protected Setup) button if present. The WPS button location may vary from router to router. An indicator light on the router will begin blinking.
NOTE: On some routers the consumer may have to login to the router “Admin” screen to enable the WPS button. The consumer may need to consult the user manual that came with the router for more information.
- On the Smart Appliance and within 2 minutes of completing step 1, press or touch the POWER button to activate the appliance, then press and hold the WiFi Connect button for 3 seconds. The WiFi status indicator icon will blink quickly and you will see a 2:00 minute countdown appear on the display while the appliance connects to the router. This can take up to 2 minutes. When appliance is connected to the router, the WiFi status indicator light will come on and remain lit.
NOTE: If the router loses Internet connection, the WiFi status indicator icon will turn off. If the appliance and router fail to connect after 2 minutes, the WiFi status indicator light will blink rapidly for 2 seconds and then turn off. Return to step 1 if this happens.
- After the WPS connection has completed, in the mobile app click the ADD APPLIANCE.
NOTE: If the appliance is already present in the dashboard, click on the appliance (click Not Now if prompted to reconnect), navigate to preferences, then click DELETE APPLIANCE. Then click ADD APPLIANCE to begin connection.
If you would like to download or view product literature for your appliance, please visit our Manuals and Literature page.